Showing posts with label Birthday Cake. Show all posts

Sunday, May 27, 2012

Sweet Party Food Idea: Cake in a Cup


Isn't this a brilliant idea for serving cake to a party crowd? Not only functional, but so darn cute! I love it.  All you do is bake your cake  in a cookie sheet. Be sure to decrease the bake time--and keep an eye on it! There is nothing worse than dry cake!  Once is it cooked and cooled. Cut with a cookie or biscuit cutter, small enough to fit in the cup.  You could do different shapes and sizes to make the layers interesting!  Use your favorite frosting to sandwich between the layers and pretty sprinkles for a finishing touch!  Wrap the cup in a cellophane bag (found in bulk at any craft store) and tie on a spoon to coordinate with your party theme!  Viola!  Cake in a cup--the perfect party food!  The possibilities are endless with this idea.  I am looking forward to trying it out with lots of different cakes and colors.


Favorite Cake Recipes:


Classic Chocolate Cake (not from a box)


Chocolate Bundt Cake


Country Cake with Lemon Curd, Cream and Berries


Barefoot Contessa Coconut Cake


Any cake would probably work--but the more substantial ones are easier to work with, in my opinion.


Enjoy!  I would love to see how you put your cake in a cup together.  Send me pictures or links at melandboys@gmail.com

Wednesday, January 11, 2012

Monster Mash Cupcakes and Marshmallow Monster Pops


Some of you might remember from this post that I have two cute little monsters with birthdays just one day apart... and in December no less!  (I know... what were we thinking, right?).  They turned 3 and 1 this year, and to celebrate we threw a Monster themed birthday party that turned out to be a blast.  Seriously, I recommend it to all you boy (and even you girl) mamas out there.  I had monster coloring pages for the kids when they first arrived at the party.  Then the games consisted of a monster hunt where I hid little pictures of monsters all over the house and the kids had to find them and feeding the monster (I made a bean bag toss into a monster's gaping mouth).  I considered letting the kids build their own monster cupcakes... but I have light carpet and limited space, so I decided against it.  I mean, keep the party fun for Mom, too, right?  The cupcakes were so much fun to make.  I got a kick out of putting together each unique little guy.  And those monster marshmallow pops were not only pretty easy, they were adorable!  And a serious hit with kids to boot.  (I linked to all the ingredients on amazon if that helps, but you can pick up most of these ingredients at Wal-Mart, too).


Monster Mash Cupcakes and Marshmallow Monster Pops
Submitted by Mindy ~ The Sisters Cafe


For the Monster Mash Cupcakes:
Cupcakes
Frosting in various bright colors (Icing paste works a lot better than regular food coloring for bright colors)
candy melts in various colors
Wilton Candy Eyeballs (or make your own with white candy melts and mini chocolate chips for pupils... I did both)
Disposable Decorating Bags
Lollipop Sticks


One color at a time, microwave the candy melts at 50% power for 2 minutes.  Stir until bowl is no longer warm.  Then microwave at 50% power for 30 second intervals, stirring in between, until the candy is melted.  Transfer into decorating bags with small round tip or ziploc bags with a small hole cut out of the corner.  Pipe horns, arms, mouths, noses and eyes on wax paper or a silpat.  Use sprinkles or edible glitter immediately if desired.  Allow to harden in a cool place.  (If you place the wax paper or silpat on a cookie sheet, you can transfer the piped designs into the fridge or freezer for a few minutes to harden.)  This can be done ahead of time.


Pipe the various brightly colored frosting onto the cupcakes using an extra large round (1A) tip (or the extra large star tip is cute, too).  Place a dot of frosting on the cupcake and pull away, repeating until your cupcake has a spiky appearance.  Just do it quick since the frosting doesn't need to be perfect.  Decorate with the previously made candy horns, arms, mouths, noses and eyes as desired.


For the Marshmallow Monster Pops:
marshmallows
candy melts in various colors
Wilton Candy Eyeballs
Disposable Decorating Bags
Lollipop Sticks


Place a lollipop stick into each marshmallow.


One color at a time and in separate bowls, microwave the candy melts at 50% power for 2 minutes.  Stir until bowl is no longer warm.  Then microwave at 50% power for 30 second intervals, stirring in between, until the candy is melted.  Immediately dip the marshmallows into the melted candy, sparing the top.  Immediately place three eyeballs on the fronts of the pops.  Place the dipped marshmallows pops on wax paper or silpat to harden.


If needed at this point, remelt the partially hardened candy of different colors in the bowls at 50% power at 30 second intervals until melted again.  Then transfer the melted candy into decorating bags with small tips or ziploc bags with small holes cut in one corner.  Pipe "hair" on the monster pops by starting at the stick and piping a strip outward to cover the exposed marshmallow, repeating until covered.


Source: I saw this idea on tip junkie and winged it!

Tuesday, December 6, 2011

Dragon Birthday Cake


I made this fun cake a few months back for my son's 2nd birthday. I'm always a little nervous until I have a finished product in my hands but I actually loved how this one turned out! My 2 year old got a big kick out of it! I got some pretty funny pictures of him pretending to be a dragon too, roaring and trying to eat the whole cake without any hands. It was a good night:) I would definitely make this cake again. The icing used for the scales is time-consuming but very easy and totally worth it. And with a little creativity and a few minor changes in the decorating, this cake could easily pass for a dragon, dinosaur, alligator etc. Bonus! The biggest advice I could give, and this goes for any birthday cake, would be to start early! Most of the time I try to bake the cakes the night before and freeze them overnight, and I can get right to work the next morning. Give yourself lots of time (just in case) and creating a special cake for your little one becomes so much more fun and a lot less stressful!


Dragon Birthday Cake


Submitted by Amy ~ The Sisters Cafe

2 (9-inch) round cakes, prepared
3 (16-oz) tubs of white frosting, if you go really heavy on the frosting you may want to buy an extra tub just in case
Green food coloring
Pastry bag, wide star tip & wide round tip
Chocolate sugar wafer cookies, cut on diagonal and paired with second cookie on the long side
2 blue M & M's for eyes
Red licorice, cut into triangles for teeth
16 chocolate chips

1. Using a cake mix or your favorite recipe, bake 2 (9-inch) round cakes in a well greased/floured pan. Allow to cool completely before removing. Very carefully remove from pan. You may now freeze the cakes for easier handling while shaping if you wish and have the time but it isn't necessarily essential, just makes the cake a lot easier to work with.

2. For the body, cut the first cake in half and sandwich the halves together, flat sides facing, with a layer of frosting in between. Set the cake upright with the cut side down, using a few dabs of frosting to stick it to the serving plate, if needed.

3. For the appendages, use 2nd round cake to shape different body parts (see diagram below) and attach to the body using frosting or possibly toothpicks if needed. Crumb coat the entire dragon with a light layer of frosting. Doesn't have to be perfect but worth the extra step. This was one of the most difficult steps for me as the cake I used for the appendages was quite soft and crumbly at this point. If you have time, stick it in the freezer for a bit beforehand and your life will be a little easier.

(These may not be exactly the right proportions, I just wanted to give you an idea of what I did.  I probably made the tail just a little bigger than drawn below)


4. Tint the remaining frosting green or any other color you prefer, reserving 1/2 T. white frosting for the placement of the eyes. Using a pastry bag with a wide, star tip and working from the bottom up to just below the top of the head cover the dragon's head and tail with peaks of green icing. Switch to a round tip, and cover the feet and head of the dragon with streaks of green frosting.

5. For the final touches, add chocolate wafer cookie back plates, chocolate chip claws, 2 blue M & M's for the eyes, and red licorice for the teeth. (Note: I didn't use any but if you choose to use toothpicks at all, be sure to remove them when serving the cake:)

Monday, July 11, 2011

Racetrack Cake


I made this adorable Racetrack Cake for my son's first birthday.  We had a Racecar Party!  Cars were definitely his favorite toys at the time, so the theme seemed fitting.  At first I planned on having just a small get-together.  Well you know me, I start gathering ideas, and I just can't seem to help myself from throwing a big, over-planned-but-worth-it PARTY!!  We ate hamburgers and chips and the kinds of food you would find at a racetrack.  I made 2 racecars out of big cardboard boxes and divided the guests into teams and had a obstacle course race with prizes for the winners (at first I was just going to have the kids run the race but at the last minute I made the adults participate and there is only one way to describe what happened next...HILARIOUS!)  We had a tire toss, colored wooden racecars, did cake and presents, and handed out a goodie-bag full of racecar paraphernalia to each kid (gotta love Oriental Trading:) and called it a night.  Phew...  The party turned out to be a so much fun (if I do say so myself!) and of course this cake was at the fore-front of the decorations.  It looked so festive and actually impressive, which is very  funny to me because it might just be the easiest birthday cake I've ever attempted.  In other words, complete success!!

Racetrack Cake


Submitted by Amy ~ The Sisters Cafe
Recipe Source: Family Fun

2 baked 9" round cakes
3 cups white icing
1-2 cups finely crushed chocolate cookie crums
2-3 cups green-dyed coconut
White Good & Plenty candies
Checked Paper or ribbon
2 toothpicks and tape
New toy cars, washed with soap and water

Using a favorite recipe or box, bake 2-9" round cakes according to package directions. Make sure to grease cake pans well. Allow to cool completely before removing from the pans. If time allows, you may even want to freeze them, which makes them much easier to handle. Cut a small semicircular notch from one cake, then position the cakes as shown below.

Using white frosting, apply a quick crumb coat to the cakes. If you have time, RE-FREEZE the cakes! It makes it so much easier to ice. When ready, cover the cakes generously in white frosting.

Place a small bowl in the center of each cake and sprinkle cookie crumbs around it to create the track.

Remove the bowls and softly press dyed-coconut onto each icing circle, then press the remaining coconut onto the sides of the cake for grass.

Lay white Good & Plenty candies in a dotted line along the center of the track.  Line the perimeter of the track with white Good & Plenty's as well.  If you run out of candies, you may also use a pastry bag to pipe a white icing border around the edge of the cake.

Create racing flags by taping small square of the paper or ribbon to the toothpicks and place them on track along with the race cars.

Thursday, May 12, 2011

Flashy Fish Cake


We had a very important person turn 4 at our house this week and he requested a fish-and-boat party.  Well, I took some liberties and expounded on the theme to create an Under the Sea Birthday Party! It was a blast and everyone loved the cake so I thought I would share it with you all. It was fun for the kids and yummy to boot!  And it gave me a little glow of satisfaction when I surveyed my handiwork (but then, I am far too easily self-satisfied! :) It doesn't take much for me to give myself a high-five!! Ha ha!) Some other fish-fun ideas that I found on the web were: freezing gummy fish in ice cubes and serving with blue gatorade - each little kid had their own mini ocean drink - and cutting out a variety of sandwiches in fish shapes (you can use the plastic sand molding tools - they come in lots of great designs). Add that to some fishy crackers and fruit and you can't go wrong with this age of crowd!

Flashy Fish Cake

The day before the party, prepare and bake a rainbow chip cake mix (or your preference) as directed on box.  You can either use two 9-inch round cake pans or a 9x13 inch dish - see note.  Make sure to grease and flour your cake pan(s)!  Take the cake out of the oven and cool on a wire rack.  Invert and gently remove from pan, wrap in saran wrap and freeze overnight.  The next day, remove cake from freezer and cut out a fish design.  Don't worry if the cake bakes unevenly and is rounded in the middle or on one side, it makes it more 3 dimensional and unique! If it really bothers you, you can always gently cut horizontally the rounded parts off the top to even it out.  The great thing about working with frozen cake is it's much easier to cut, arrange, and frost... much easier!  Having exposed cut sides of a cake to frost can be a nightmare if the cake is not frozen.  It's difficult, if not impossible, to get the frosting to adhere and you end up with crumbs all throughout the frosting and the cake edges completely crumbled away. Take my word for it... freeze the cake before you cut into it!!   note:  I baked mine in two 9-inch round cake pans. One was used as the body of the fish and the other I used to cut out a tail and fins.  However, I think baking in a 9x13 would work well. The fish might be slightly smaller but it would be easier!

Prepare buttercream frosting tinted with blue food coloring and frost your fish cake.  To decorate with scales, buy two bags of gummy rings (I bought peach and sour apple).  Cut 1/4 of each ring out and pinching the cut ends close to together, lay in rows across the fish, starting at the face.  Turn a gummy ring over so the white side is exposed to use for the eye - use one of the little cut-out pieces for an eyeball. Give your fishy a grin with a red vine licorice or you could make adorable fish lips with more gummy ring cut-outs.  Get creative and have fun!!

Buttercream Frosting

3/4 cup butter (1.5 sticks), room temperature

1 1/2 tsp vanilla extract

1/3 cup milk

6 cups powdered sugar

Beat butter and vanilla together.  Alternate adding powdered sugar and milk until you reach the desired consistency. Personally I like it rather thick when I'm decorating a cake (as long as it's frozen).

Thursday, March 24, 2011

Butterfly Birthday Cake

One of my favorite things about a birthday party is the cake. Not particularly the eating of it. It's more about the excitement of a festive and beautifully decorated cake with candles burning and everyone gathered around. It's special and fun and exciting and I just love it! I remember my mother creating the most fantastic cakes. There was one that is etched into my memory... a wonderful, big elephant (my favorite animal) with a long trunk and a gloriously colorful blanket/saddle over its back. I loved it then and I love the memory of it now. It was so fun to watch Mom come up with the design and build the cake. You knew, as you watched her work, that it was all for you. All that effort and excitement was because you were special and it was your day that everyone was celebrating. It was thrilling as a child! I want to recreate that for my little ones now. It's my turn to shape and build and create a cake that my child will love. It is so fun!! My sweet baby daughter is turning a year old this week so I made our "little bug" a butterfly cake! She is a beautiful, tender-hearted, little darling with a personality that melts your heart. What a treasure she is to our family! Happy Birthday Nyah!! Butterfly Birthday Cake


submitted by Brittany ~ The Sisters Cafe

2 yellow or white cakes

Prepare cakes as directed on the box. Bake each in a 9x13 inch pan that has been greased and floured. Cool on rack. Once cooled, carefully remove cakes from pans by inverting and gently easing them out with a spatula if needed. Wrap in wax paper and freeze cakes. *freezing the cake makes it easier to cut and to frost.

Prepare a surface to present your cake on. It will be too big for a platter! I learned from Mom the trick of covering a large piece of cardboard with tin foil. Mine was 21 inches square - I used the side of a diaper box! :)

Unwrap one frozen cake and place gently on cutting board. Measuring lengthwise, mark a spot 8 inches across on top (about 2/3 of the way) and 4 inches across on the bottom (about 1/3 of the way ) - cut diagonally to connect the two points. Now make two diagonal cuts from the ends of the original diagonal cut to the opposite corners. This will remove thin triangle pieces of cake from the ends. You will be left with 2 big triangles - the top portion of the butterfly wings. Since I forgot to take a picture of this - I did a lovely drawing for you. It's not pretty but you get the idea, right? :)

With the second cake, make a long diagonal cut from one corner to the other. Then measure 4 inches in from each end and make a perpendicular cut directly to the opposite corner. (Since I am so horrible at describing this, here is a picture! I'm showing you how I measured the 4 inches in before cutting down to the corner.) You are left with 2 long triangle that will be the bottom portion of the wings.


Using one of the thin triangles discarded from the first cake, cut out the body of the butterfly. Now put your butterfly together! You can use the top picture as a guide. Here comes the fun part... you get to frost and decorate your masterpiece however you like! Have fun with it!

Buttercream Frosting
1 cup butter, softened

8 cups powdered sugar

2 tsp vanilla extract

1/2 cup milk

In a mixing bowl, cream butter. Beat in sugar, vanilla, and enough milk to reach desired consistency. Separate frosting into bowls and color as desired. (I would suggest using concentrated gel for making icing colors - I like Wilton and they have a great selection of colors. It makes much more vibrant colors with less dye than the food coloring drops.)


Monday, January 31, 2011

Pirate Birthday Cake


My 3 year old son loves pirates. He loves to play make-believe about them..."Mom, the pirate's coming...he's scaaaary", he likes to sword fight like them, and he even likes to point them out at local parks. He was just certain he had seen a real pirate last summer. I was really hoping the tattooed man with the scraggly beard and shirt off was hard of hearing as my son pointed at him, yelling, "MOMMY, PIRATE, MOMMY, PIRATE!" So when it came time for his birthday this year, we knew just what kind of birthday bash to throw for him. He positively LOVED his pirate cake and I loved how simple and absolutely adorable it was. I would definitely recommend making this cake if you are looking for something to please your pirate-loving buccaneers! If you're in a pinch, you may be able to skip a few of the freezing steps below. However, if you have time, I think they are definitely worth the extra effort. Here's the pirate invite we sent to his friends:


Pirate Cake


Submitted by Amy ~ The Sisters Cafe
Recipe Source: adapted from Betty Crocker


1 box cake mix (any flavor)
Water, canola oil and eggs called for on cake mix box
2/3 cup chocolate frosting
1 container vanilla frosting
1 chocolate-covered mint patty - eye patch
1 large marshmallow, cut in half - eye
1 blue peanut m&m or gum ball - eye
1 gummy life saver - earring
2 rolls strawberry Fruit by the Foot - stripes, mouth, eye patch
1 black licorice - hat
2 square-shaped candy-coated gum - teeth
Chocolate sprinkles
Tray or cardboard, covered, at least 18" x 15"
Gold coins, optional

1. Heat oven to 350 (325 for nonstick pans). Spray nonstick cooking spray on bottoms and sides of 1 (9-inch) round cake pan and 1 (8-inch) round cake pan. Grease them quite a bit, you'll be grateful later. (I used 2 - 9" round cake pans and just cut off a 1/2 an inch around the entire cake. It added an extra step but it worked okay) Make cake as directed on box, using water, oil, and eggs. Pour into pans.

2. Bake as directed on box. Allow cakes to cool completely (and I mean completely:). Carefully remove from pans, trying not to loose the bottom of the cake. At this point I strongly recommend freezing the cakes. It makes the cutting and icing steps MUCH MUCH easier. In fact I made my cakes the night before the party, put them in the freezer overnight, and finished up the next morning. I've tried to work on room temperature cakes before and it can be very frustrating.

3. While still frozen, use a serrated knife to cut the 9" cake almost in half. One half will be just a little bigger than the other. If you are like me and like as much guidance as possible, download the template here, and cut out and trace. Or just refer to image below. The smaller half of the 9" cake will be the hat and the larger half will be the body of our pirate. Cut 8" cake as directed below. However, don't discard the extra piece of cake as it says. That will become our pirates nose. Place cakes on tray as directed. Next, shape ears out of the extra pieces on the the 9" cake. Cut nose out of the extra piece of the 8" cake. Use a small amount of frosting to attach the ears and nose to the cake. Carefully cover with wrap and place in the freezer for an hour or so until firm again.


4. Reserve 2 teaspoons chocolate frosting. Mix 2/3 cup of vanilla frosting with reserved chocolate frosting. This tints the frosting slightly and will be used as the "skin" color for head, ears and nose. The chocolate frosting will be used for the hat. The vanilla frosting will be used for the body of the pirate. Quickly but carefully crumb coat your pirate. Adding a crumb coat layer to your cake makes frosting SO much easier. All you do is add a quick first layer of frosting to the firm cakes in the appropriate color. It doesn't need to be perfect, crumbs will show through here or there, but it allows you to do really nice and smooth top layer later on. Cover and put the cakes back in the freezer until firm again.

5. When ready, remove from freezer, smoothly ice your final layer of frosting on your cake and get ready to decorate. Add mint patty for the eye-patch, marshmallow slice and blue m&m for the eye, and gummy life-saver for the earring. Cut fruit by the foot into shapes for the shirt stripes, mouth, and strap for the eye patch and place on cake. Cut licorice to fit hat. Add gum for the teeth and chocolate sprinkles for the whiskers. Store loosely covered at room temperature. Enjoy!

*Some of you have requested a copy of the invitation so I thought I'd show you what it looks like minus all my personal information.  If you would like a copy of either a jpeg or photoshop format of this invite, leave me your email and I will send you over an original copy, which you can add your own information to.  Sorry I haven't had time to figure out how to do a shared file.  I originally designed the invitation to be 6" x 6".

Wednesday, December 29, 2010

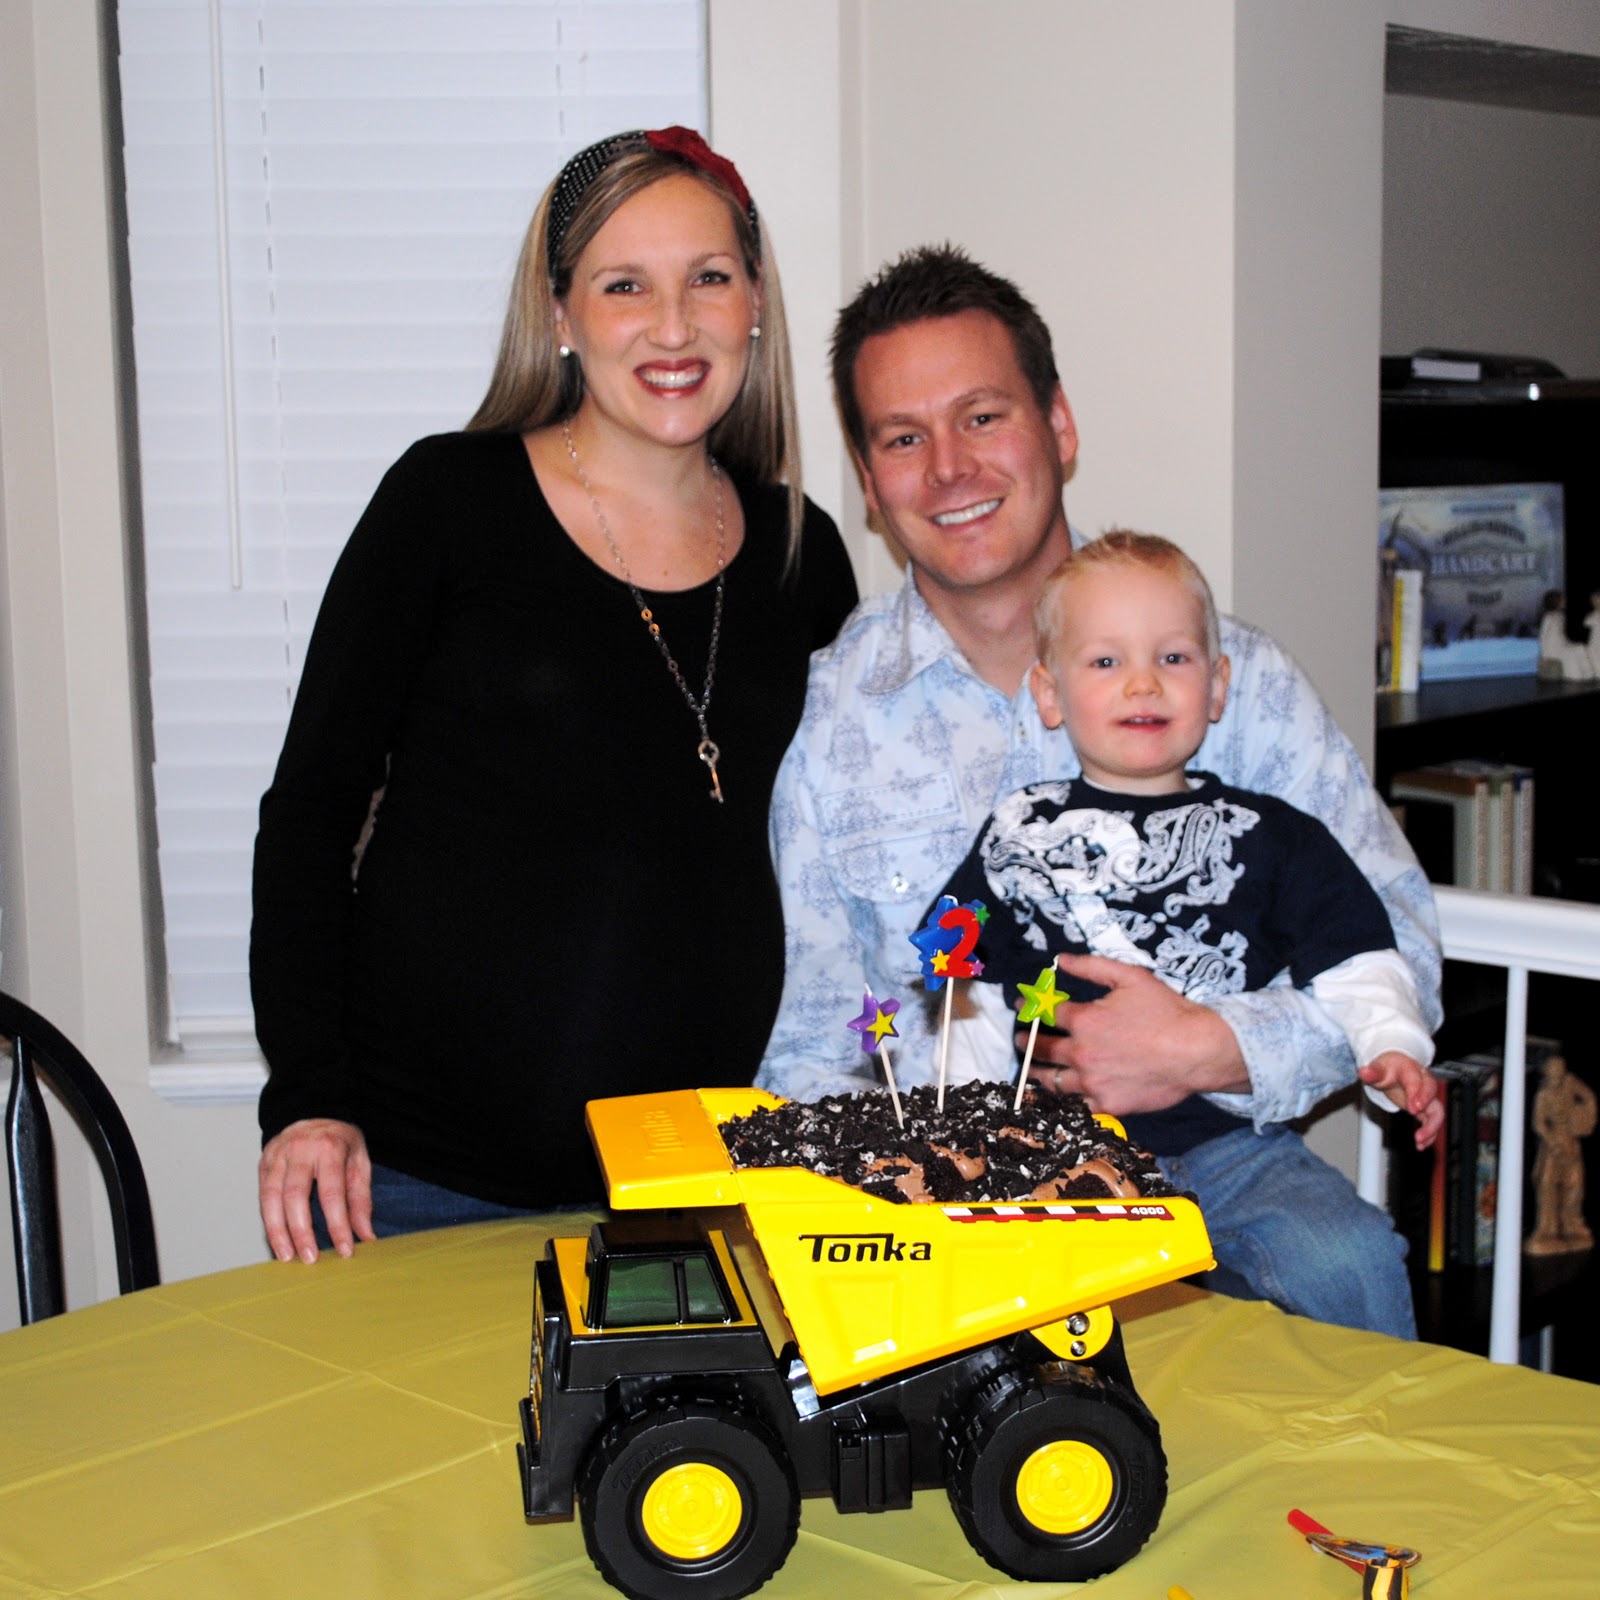
Mud Trifle and a Dump Truck Birthday Cake


My little boy had a birthday the week before Christmas.  I was practically nine months pregnant, and I was looking for something easy.  I saw this dump truck cake idea on the internet.  So much potential,  but the versions I saw looked painful to eat (cubed cake with hershey's chocolate syrup drizzled on top).  So I decided to come up with my own "Mud Trifle" that would taste yummy and still pull off the muddy dirt look. What a hit!  My two year old LOVED it, and all the other little kids were giggling and laughing about eating "dirt" for dessert.  Well, all except one of my niece's who needed several reassurances that it was truly NOT dirt before she would touch it. :) We had quite a few guests, so I actually made a second trifle in a pretty trifle bowl... but somehow I didn't get a picture of it.  A spin on this idea would be to buy each child a small dump truck and put a chocolate cupcake with chocolate frosting and crushed oreos on top in the back of each one.  The small dump trucks would be your party favors.  (I saw some little dump trucks that would work perfectly at Wal-Mart for $3 each).  I wanted to do this, but with Christmas and being mega prego... it just didn't happen.  :)

PS I had my new baby boy the very next night! 8 lbs 11oz and totally adorable. :)


Mud Trifle and a Dump Truck Birthday Cake
Submitted by Mindy ~ The Sisters Cafe

1 large toy dump truck
1 chocolate cake mix (any kind will do) prepared in 9 x13 pan
1 5.1 oz instant chocolate pudding mix
2 cups whipping cream
1-2 Tb of powdered sugar (optional)
1 package of oreos

Cube cake into 2 inch pieces.  Whip cream with hand mixer.  You can add 1-2 Tablespoons of powdered sugar if you like things a little sweeter.  Make pudding mix according to directions, then fold in the whipped cream.  Chop the oreos using a kitchen knife, or you could certainly crush them instead.  Layer chocolate cake cubes, pudding mixture, and oreos one at a time to fill the toy dump truck.  I made sure to set each layer back an inch or so from the previous to give the appearance of mounded dirt.  Then I made sure to glob a little of the pudding mixture out over the cake cubes at the back.  I included the picture from the back of the dump truck so you could see what I mean.  Insert the candles and enjoy!